前言
使用 Fedora 操作系统多年,一直渴望着能自己编写 GNOME App,也一直没有实现。最主要的原因就是没有合适的开发环境让新手适应 GTK+Adw 软件开发。以前有过尝试用 GNOME Builder 写程序,可是在写出第一行代码前一直在排查自动补全相关的问题,这让我非常苦恼,不知道是缺少安装了什么软件包。后来我尝试用 VSCode 从零开始写 GTK 程序,在代码补全和提示方面非常舒服,只可惜对构建系统的支持和 Flatpak 环境运行有非常多的问题。
在清理不再研究的项目时,系统里安装的超多开发库没办法一个个卸载掉,甚至还会破坏原本正常使用的桌面环境,不得不为此重装系统。
直到今天我才摸索出一套非常完美的开发方式。接下来就详细说明讲我是怎么配置的。
操作系统的选择
开发软件的第一个头痛的问题就是选哪个操作系统。我用过的系统有 Windows10、Ubuntu20、Debian12、CentOS7 和 Fedora 系列。
就我个人看法,最合适开发的就是 Fedora Sliverblue 系列。利用 Toolbox 创建的容器空间,其不可变特性保证开发应用时安装的依赖环境不会破坏主机,而且随时能删除并重新创建容器,非常方便。
- 主机使用 Fedora Sliverblue
- 利用 Toolbox 创建容器空间。
- 在容器空间中运行 IDE,也可以在其中安装 Wine 运行 Windows 程序
- 开发结束时移除容器,或重新创建容器。为开发而安装的旧依赖将完全清除。
- 容器内的GUI应用可能无法正常使用 Ibus 输入法
Toolbox 容器的使用方法
Fedora Sliverblue 默认装有 Toolbox 和 Podman。容器默认使用 Fedora CoreOS 本质是 Podman 容器,但是由 Toolbox 创建能自动配置好,使其能与主机之间交互。运行 GUI 应用的环境也可以正常在主机中显示。
问题是非特权用户使用容器,会将用户的 home 与容器内的 home 捆绑,导致容器内创建的开发环境也影响到用户的 home 目录。这里提供一个解决办法:
- 在主机执行
toolbox create下载和创建容器。 - 将以下内容保存成可执行脚本
~/.local/bin/tbox,设置可执行权限755:
1 |
|
- 在主机执行
cp /etc/skel/.bash* ~/TboxHome/使得容器内的 shell 可以使用与主机相同的环境变量。 - 在主机执行命令
tbox,进入容器。 - 在容器内执行
cd ~ && pwd可以看到,容器内的 home 目录变成 TboxHome 文件夹。这样就将容器 home 与主机用户的分开互不影响了。
安装 GTK-Rust-Blueprint-Meson 开发所需依赖
- 安装以下 Flatpak 运行时和开发包
1 | flatpak install --system flathub \ |
- 执行
tbox进入容器环境,安装以下依赖:
1 | sudo dnf install \ |
如果需要在 VSCode 以外的地方构建 GTK 软件,则必须在容器中安装依赖和构建工具。比如:
mesoncargorust-analyzer
下载安装 VSCode
- 从 VSCode-AppImage 这里下载AppImage镜像文件。
- 将文件重命名为
code。 - 将镜像文件移动到
~/TboxHome/.local/bin/目录中,并赋予755可执行权限。 - 进入容器,执行命令
code打开VSCode。
或者按照 官方文档 在容器内添加软件仓库,用包管理器安装。
2
3
echo -e "[code]\nname=Visual Studio Code\nbaseurl=https://packages.microsoft.com/yumrepos/vscode\nenabled=1\nautorefresh=1\ntype=rpm-md\ngpgcheck=1\ngpgkey=https://packages.microsoft.com/keys/microsoft.asc" | sudo tee /etc/yum.repos.d/vscode.repo > /dev/null
VSCode 安装必要插件
- EditorConfig for VS Code (作者:EditorConfig)
- Even Better TOML (作者:tamasfe)
- Flatpak (作者:Bilal Elmoussaoui)
- Gtk Blueprint (作者:Bodil Stokke)
- Meson (作者:mesonbuild)
- rust-analyzer (作者:The Rust Programming Language)
添加 VSCode 文件和搜索排除项
必须配置,不然 CPU 和 IO 占用直接拉爆!!!!
在 VSCode 设置中搜索关键字 exclude。找到【Files: Exclude】和【Search: Exclude】选项,添加**/.flatpak。
如果使用全局 settings.json 来设置,相当于加入以下内容:
1 | "search.exclude": { |
使用模板代码创建项目
下载 GNOME Gitlab 官方网站提供的模板代码。可以看下 README,上面有说明怎么使用。
一般用法就是执行 create-project.py 这个文件,其他文件不要动,也不要把模板代码当作项目用 VSCode 打开。
执行 python3 create-project.py,根据提示输入信息,比如以下内容:
1 | ➜ python3 create-project.py |
然后脚本会在模板代码项目里生成 hello_world 这个文件夹,这就是我们的项目最初始的代码了。把这个文件夹移动到其他地方,比如 ~/Projects/ 里面,方便管理。
最好将模板代码做一次 Git 提交,方便项目配置出错时排查错误。
构建并运行 Hello World 项目
用 code 打开 hello_world 文件夹,会有通知提示是否进行构建(不要点YES)和重启 Rust 语法分析器,也会有提示错误,如果是提示以下内容,可以暂时忽略不管:
1 | Failed to load RustAnalyzer integration: |
如果是提示缺少 Flatpak SDK,则按照要求用 flatpak 安装后,重启 VSCode 即可;如果 main.rs 报错提示 mod config 不存在,不必担心,第一次构建项目时将自动生成。
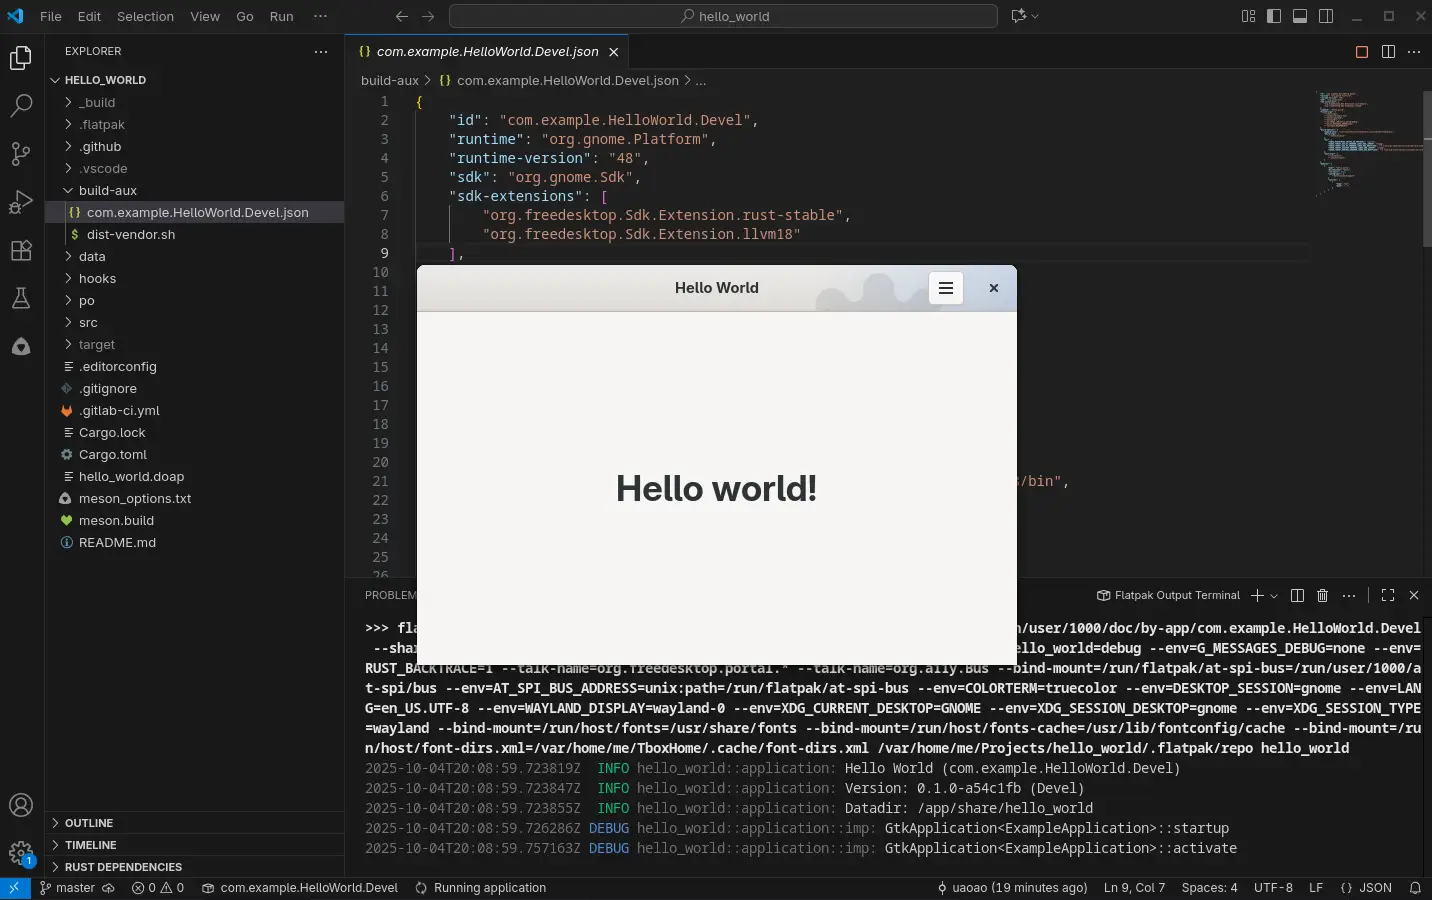
编辑 meson_option.txt,将 value: 'default', 改成 development 并保存。打开 build-aux/com.example.HelloWorld.Devel.json,如图所示,点击 右上角 的三角形运行(运行中显示红色方形)。
成功运行后建议再进行一次 Git 提交。
添加 Blueprint 支持
可以参考 官方文档 进行配置。
- 将以下内容保存到
build-aux/blueprint-compiler.json文件中:
1 | { |
- 在
build-aux/com.example.HelloWorld.Devel.json文件的modules模块下(大概在第38行)添加blueprint-compiler.json这个子模块,如下所示:
1 | "modules": [ |
- 编辑
data/resources/meson.build,如下所示:
1 | # Compile blueprints |
- 将
data/resources/ui/目录中的 .ui 文件全部替换成对应的 .blp 文件,文件内容如下:
- window.blp
1 | using Gtk 4.0; |
- shortcuts.blp
1 | using Gtk 4.0; |
- 点击右上角三角形按钮构建运行,如果可以运行,则说明 Blueprint 配置成功。
至此,GTK 应用开发环境完成搭建,建议此时进行一次 Git 提交,之后可以利用这套模板方便地进行 GTK 桌面应用开发。
另:重新创建最新的容器
有时添加了多余的依赖库或停止当前的项目开发,可以用下面的方法重建容器。
- 执行
podman ps查看正在运行的容器。假设 Toolbox 创建的容器名称为fedora-toolbox-42 - 执行
podman stop fedora-toolbox-42停止容器 - 执行
podman rm fedora-toolbox-42删除容器 - 执行
podman pull registry.fedoraproject.org/fedora-toolbox:42更新容器 - 执行
toolbox create创建新容器 - 执行
tbox进入容器shell
可以安装 Pods 方便管理所有Podman容器。